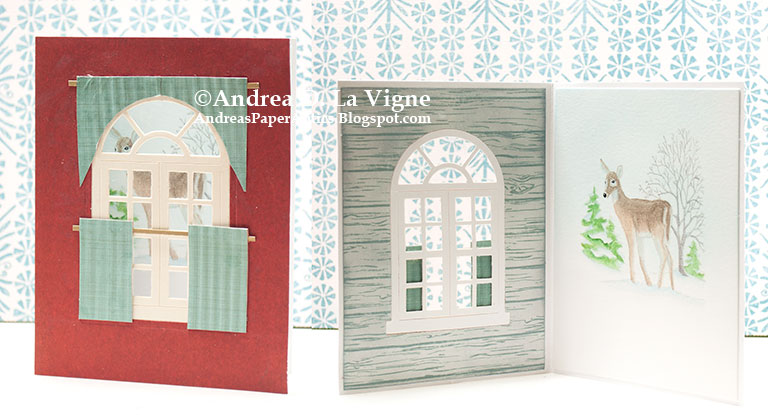
I LOVE how this card turned out!!! I made it for my former counselor & his wife. I had intended to do a Christmas card for them, but ran out of time. Since I'm a bit late for that now, I made it a general winter card instead. It took a lot of mental focus, to make sure I didn't mess anything up, but I'm especially proud of my work on this one!
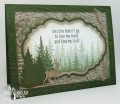
I temporarily adhered my burgundy paper to the front of a white A2 card base, and die cut through both layers with the window die. (I did make sure to open the card while die cutting, so I didn't cut the back as well!) I also die cut the window itself from cream & white cardstocks, backed with Stick It adhesive, for the window front & back.
I closed my card base, and lightly traced the opening onto a 4x5.25" panel of vellum bristol that I'd temporarily adhered to the inside of my card base. I used the window tracing to help position my stamp. I stamped the image with Fade-out ink so I could do some no-line coloring. This is the first time I've used that ink, & at least for colored pencil work, it is perfect! After erasing my pencil lines, I colored the deer & trees with my Prismacolor pencils. I did cover up the spots on the deer, since they made it look kind of like a fawn, & I didn't think a fawn would be in a snowy scene. I looked up photos of white tailed does online, so I could get my colors as accurate as possible. After I'd finished coloring, I used my Distress blender brush to ink the sky with a light layer of Tumbled Glass Distress ink.
I inked a piece of mixed media paper with Weathered Wood Distress ink. I stamped the wood pattern onto that panel with Weathered Wood Distress Oxide ink, for a tone-on-tone look. I wanted the look of wood siding, and I think this came out perfectly. I glued that to the inside of my card, making sure to sandwich a piece of acetate between that & the card base, so I would have a place to adhere my windows.
I adhered the burgundy panel to the front of my card, and stuck the cream window to the acetate in the open area. For curtains, I cut 2 pieces from the blue "Canvas" paper, and ran them through my paper crimper. Then I realized that the back of the paper would show through the window on the inside, so I cut one longer piece of paper, crimped it, and glued my curtains to that, so the blue was on both sides, making sure to line the crimping up. I then cut that down, so I had 2 curtains. I cut a 1/16"-wide strip of gold shimmer cardstock, and glued the curtains to that so I had a "rod." I glued that whole piece to my card front. For the valance, I cut a panel of patterned paper & used the window die to trace the curve for the bottom edge. I crimped that, and glued it to my card front above the window. I also cut 2 little pieces from the remainder of my gold strip, and glued them to either end of the valance to make it look like it's on a rod, too.
I adhered my white window to the inside of my card front. I adhered the image panel next, & that finished this card. Like I said, I really REALLY like how this turned out. Hopefully the recipients will, too!
Date: Wednesday, January 16, 2019 GMT Views: 420
Favorited:2
Registered: February 3, 2005 Location: Delray Beach, FL Posts: 34769
Tue, Jan 29, 2019 @ 3:42 PM
WOW! Andrea, this is gorgeous, and your fawn with no-line coloring is exquisite and so delicate -- like a fawn is. What a stunning layout with the window, and it was worth all the mental and creative work, sweet friend. Truly love this a lot! Congratulations on the no-line coloring, and do it again. I need more practice myself...hehe! Hugs and love! xoxo
------------------------------ Cheryl
Proverbs 3:5-6 My blog